Renovation // Transformation

Renovation // Transformation

Blind Finish

So, getting the correct hardware for the second order from Blinds.com was about 3 weeks in the making, but we finally got it right — and my faith in decent customer service was restored, thanks to Annette.

The main reason for the posts and pictures was to explain what was going on to folks on the other end of the phone (and ultimately, the vendor). Hopefully, too, these images will help them to get future orders correct.

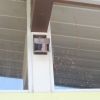
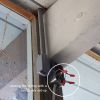
The initial order came with brackets that were too short (that would not fit the blinds) and no covers. The second order came with brackets that were too long, and covers that were too thin and not a good color-match. The third order came with the correct brackets and covers — the same that came with our initial order last year. And now, we have lots of leftover parts…

It's useful to note that the mechanism has changed a bit. The new design is a bit easier on the install, but more visible in the end. Given that the measurements were not that hard to begin with, I do prefer the original, less-visible design, but this is what we've got.

We've installed two of the nine blinds… hoping all goes well for the other seven (which are side-by-side blinds for the sliding doors).

Thanks again to Annette and the team at Blinds.com…

SNC11146

SNC11147

SNC11148

SNC11144

SNC11145

Renovation // Transformation

Motion Addition

The exterior-lighting of Eichler homes — as most of you know — can be described as deficient at best. Along the way, we've been updating the electrical when/where we can, including adding a few additional exterior lights where we can.

One area that's ironically dark is the front of the house. With the low-wattage burn of CFLs, we leave the front entry light on almost 24/7 and the path lights come on at dusk. However, we really wanted a motion-triggered driveway light.

As you've seen, these can get really ugly and we ideally wanted to match the back light (a Remcraft fixture)– but I did not run electrical to the location when we had the roof done, so I though we were out of luck. Come to find out, penetrations in a foam roof are not all that uncommon, as long as you do it correctly (and seal it with the right stuff). An email to our roofer confirmed that Sikaflex-1A (available in Concord at White Cap) was the material of choice to seal the puncture. So, with a yellow tube of caulk in hand (and a drill), I proceeded to drill 2 holes in my roof — one where the light was to sit (in between the front garage doors) and another where the power was to drop down into the garage — in this case in an area to be triggered by a remote (off-light/off-center) motion sensor (the post and beam will eventually be painted brown almost hiding it). Weather-proof PVC conduit protects the wire.

So, in a few hours later, we had motion-activated entry lights that coordinated well with the Eichler design. Best of all, it works.

100_4734 100_4735 100_4736 100_4738

Renovation // Transformation

Front landscaping: Before and After

While there's a few small things still left to do (namely replacing the front sidelight window and some trim painting… it will be dark brown), the front of the house is largely complete thanks to the help of Jaime, Jacob, Chris and Ivan.

Chris and Ivan are from Labor Ready, Jacob is a former student who's super-interested in craftsmanship and construction and Jaime is a landscaper who just launched his website: jzcruz.com. Neighbors Ryan, Kyle and Bret also joined in the fun by helping with the fence and pavers.

But with this weekend's installation of the sod (a low-water variety of fescue) by Jaime and crew, the yard is looking complete and a lot different than it was 2 years ago. The renovation's been a long process, but milestones like this make it seem worthwhile.

The "side yard" features natives (manzanitas, mostly, with flax along the back) fed with a drip system while the yard itself is fed by a simple, low-flow sprinkler system run by Rainbird-1800SAM bodies and MP heads — both purchased locally from Ewing Irrigation Supply near the Target in Pleasant Hill — they have a nice, walk-in shop with a great selection. The Rainbird-SAM bodies are nice as they don't leak as much — especially on the downhill sprinklers. The sprinklers are tucked into the corners of the yard off of the sod for a cleaner install.

The path lights are from a simple Home-Deopt kit that served well. We installed another identical kit in the back for path and up-lighting in the pepper-tree which has a nice effect. While low-voltage might seem daunting compared to LED-solar, it was an easy install and much nicer than LED. From an eco standpoint, I'd have thrown 2 sets of crappy LED solar lights away because of the low-quality (light-quality and build-quality) before I went back to low-voltage anyway, so the offset is okay by me.

Anyway, before and after pictures are below. The new landscaping has a lot of growing-in to do, but…

Before1

Before2

After3

After2

After5

After6

Sprinkler

Renovation // Transformation

Order redux

As you might have read, we're real fans of Blinds.com solar shades. So much that we recently ordered shades for most every window and sliding door in the house. The order arrived the other day, but we had to set it aside as other projects took priority.

Today, I'm dreadfully sick at home and in the attempts to be somewhat productive, I opened the boxes today. Unfortunately, it seemed they shipped the wrong hardware and/or the right hardware fell out of the damaged box. So, since I have a digital camera and a website, I thought I'd make the Customer-service call a bit easier by supplying pictures.

Annette was great to work with over the phone (she even called me back to confirm something), and we're looking forward to some shade soon with the new hardware and end-caps they'll be sending. Hopefully before guests arrive as the guest-bed is the shade resting place for now.

One thing to note is that the shade mechanism itself seems to have changed a bit, and perhaps not for the better. The old style was a twist-and-lock end cap whereas the new style is a retractable, tension-fit cap. The old style seems way more sturdy (albeit more finicky when mounting the brackets, but accurate measuring isn't that hard), so we're hoping for the best. I hope that — because of the error with the brackets — that they didn't give me the wrong mounting mechanism, too. That would suck as it would mean re-making all nine shades.

All in all, it's still been a very positive experience with Blinds.com… So, in the hopes to get the right hardware fast, here are some pictures…

100_4630

100_4638

100_4631

100_4632

100_4633

100_4637

100_4640

100_4641

Renovation // Transformation

Arcadia Slider Parts Available

We've salvaged some sliding doors (sliding panels only — all sizes) from a house under renovation and will be stripping them (handles, actuators, rollers, etc)… and will be warehousing the parts in our garage for posterity.

Unfortunately, the entirety of the doors will have to go soon (frames, glass). The doors themselves are presently intact, so if you need a whole sliding panel, please let me know ASAP. They've been painted white, but can be restored easily.

After this weekend, the doors will be gone, but we'll have all of the parts we were able to salvage… so if you ever need anything, drop me a line.

(Thanks to Erina and Alan for the donation of the doors and parts)…

Renovation // Transformation

Pave the Way

With the help of neighbors and friends, Ryan and Bret, we were able to get the pavers placed today. Tomorrow, I'll place the landscape lighting and finish off filling around the pavers with pea-gravel, but getting these in-place made a huge difference to the front of the house.

Special thanks to Tony at Bertotti Landscaping for the supply of the pavers.

100_4476 100_4475

Renovation // Transformation

A Busy March/April

This month's been particularly busy yet not well documented — hard to hold a camera when your hands are wet and covered in dirt (yes, we were outside). But the lack of news does not indicate a lack of progress… we're in the midst of the following:

  • A low-retaining wall along the side garden
  • A higher "sitting" wall a bit further down… this will eventually be faced in Eichler siding (it's constructed of 3 stacked 6X6s) with a bench-top.
  • A decomposed granite pathway… two yards down, one more to go. (fyi: Tamping by hand is a pain in the ass.).
  • Installation of a 4-zone irrigation system run by simple hose-timers… we don't need much water, but when we do need it, we often forget about it, so best to make it semi-automated. We ordered (and have so far been impressed with) a few items by Claber (ordered from Amazon): a hose reel, timers, and other irrigation bits… we like the orange color. Still need to work on filters and pressure regulators. (The image below also shows our wall-mounted AC/heater unit from LG)
  • Planting of Casie's garden: tomatoes, squash, herbs, lettuces… can't wait 'til july. Getting good soil in there was more problematic than necessary. Lesson learned: when you need lots of stuff, buy by the truckload, not by the bag.
  • Planting of natives along the side garden. Manzanitas (shrub and groundcover), pacific myrtle, ceanothus, juniper and sedums join the existing dogwood, maple, fig and guava trees.
  • Demarcation of some planting/lawn areas in the front and back… sticking with the original redwood separators
  • Installation of landscape lighting along the side garden. The pepper tree looks cool when up-lit.

Still to come…

  • Sod… looking to create two small "lawns" in the front and the back. As much as we'd like to xeriscape, imho, it looks a bit desolate and unkempt. We'll likely install a low-water turf-grass and have that be the *only* thirsty plant in the yard (and a small patch of it at that). We haven't had terribly good luck with sod in the past… hoping for the best here (planning on calling the "sod shop" in Martinez… shying away from the rotting bales of sod at big-orange.)
  • Stepping stones: Thanks to Tony at Bertotti Landscaping, we'll be installing these 24X24 concrete pavers throughout the yard — here in a 2X2 pattern accented by landscape lighting.

A special plug: Looking for California natives was tough until I found Buckeye Nursery in Petaluma — a joint also run by Tony Bertotti (see above) of Bertotti landscaping… lots of manzanitas, ceonothus, etc… much better than the catch-as-catch-can finds at local nurseries and the big-box stores. Check them out.

100_4458 100_4459 100_4465 100_4457 100_4467

Renovation // Transformation

A Birthday Present of Sorts…

Casie's birthday is this week and she's wanted a garden for some time… and now's a good time to start planting. We've planned a decent spot in the side yard, but the plan called for the construction of a retaining wall… which also meant clearing a lot of dirt, etc… but Monday (and a lack of fence boards) found me starting (and nearly finishing) the wall… materials off the truck by 11am and the last screw drilled at 6pm…

The wall is made of three stacked redwood posts (4X4), so it's about 12in tall (9, once we get pavers/gravel in), but it helps to level out the otherwise uneven yard and created a nice barrier. The first course of posts is anchored into the ground with several 1/2in rebar supports (drilled and pounded… I used 2 foot  pieces, so they go a good 20in into the ground. The second course is bolted to the first with 1/4inX6in galvanized bolts and the top course is toe-screwed from the inside to the course below it… all in all creating a fastener-less-looking wall with some visual heft. I backfilled with a bit of left-over fence post mix (and instaled on a bit of paver-base), so hopefully it'll be stable. We also had lots of dirt left over from the front walkway dig-out (post to come), so we have some good backfill for the non-garden area.

This weekend will be plumbing for a drip irrigation system… and hopefully by Sunday (her bday), she'll be planting tomatoes.

Wall1
Wall2
Wall4

Edit: Jeremy asked for more specific information… here goes.

Walldraw

Renovation // Transformation

Tall Fences

The fence project is about 24 boards from being finished on all four sides… unfortunately, I'm out of stock and Home Depot has gotten in some super-crappy lumber the past few loads (I've been to 3 stores… oddly, all within a 15mile radius) and I'm presently unwilling to pay Dolan's lots more for only moderately better stock ($5 vs. $8). But here are some images…

I can also share a few experiences:

  • A pneumatic nail gun is amazing: I used galvanized nails for the rails (toe-nailing) and face nailing in this stretch of the fence (as opposed to brackets and screws on the first). Installation went 5X as fast.
  • Cutting all of the posts to the same height (thanks to the mason line and line-level) and then installing the top-rail on top on these (and face nailing into the post — creating almost a bridge-like look) is much easier, cleaner looking and potentially much more stable (than using brackets installed lower on the post). Then installing the bottom rail in the opposite direction makes for (1) a good place to face nail the kickplate and bottom of the fence boards but (2) makes for a more stable fence.
  • Installation of kickplates (base boards) is initially a pain, but it
    keeps the neighbor's terrier, Peaches, out of our yard and makes
    installation easier, too… just set planks on top of the plate and
    nail.
  • Rental of a 2-man auger — although expensive — was a real time and back saver for re-digging the post-holes.
  • Hiring out a bit of the manual labor for the tear out is a good way to spend a few hundred dollars and not herniate a(nother) disc.
  • On one side — to save the neighbor's pretty flowering crabapple tree, we jogged the fence half-way down the line, likely giving up about 3in of yard, but saving the trunk of the tree (and the sightline of the fence)… oh well.
  • Zinc-based wood treatment smells funny… so it better work to help preserve the base of the posts and cut ends of the pressure-treated lumber.

100_4378
Fence2
Fence3

Renovation // Transformation

All In A Day’s Work…

After last weekend's gate-a-palooza, I thought it might be nice to finish off the fence project. On Friday morning I called Labor Ready and booked Chris and one other guy for the day. Chris was here before and did great work.

The team — Chris and Anthony — showed up a bit past 9AM and by 11am, the fence was down and loaded into the truck for a dump-run ($60 at Contra-Costa-Waste) — their progress was amazing. By lunchtime (1pm), all of the post-holes were dug. by 3pm, the posts were set, concrete was hardening and the team was on their way to enjoy their respective Saturday nights…

Sunday morning, I was ready to make a lumber run… I first stopped at Dolan's in Concord which is where I prefer to buy my lumber. Knowing their price was 20% higher than Home Depot, I asked: "If i buy a few hundred boards, can I get a bit of a price break?" While I wasn't expecting them to match Home Depot's price, 10% off would have kept me there.

The response: "Nope, that's what they sell for"… One of the reasons I like Dolan's is that they load your materials… so I weighed the idea of spending several hundred dollars for this service. In the end, frugality won out and I headed to Big-Orange where I not only saved money, but got better lumber (really) and even got someone to help load the cart and load the truck. When I got home, I sent Dolan's a quick note entitled: "Why I didn't spend $1000 at your shop today". While I'll surely be back there eventually, I might be tempted to stop at Home Depot first now.

By Sunday afternoon, the fence was finished…

Anyhow, below are some pictures of the progress and end result.

SNC10715
SNC10713
SNC10722

Scroll to Top