Renovation // Transformation

Renovation // Transformation

Busted Up and Back Together Again

We knew our radiant heat was not top-notch, but the previous vendors assured up (with a leak test) that we were OK and the boiler was safe. Unfortunately neither was true… We got a tip from a neighbor that Anderson Heating were the folks to call and we're glad we did (call them).

They showed up about 5 minutes early, which is always nice, and they assured us that they'd have everything they'd need to do the job with them (and they did). They IDed one problem right off the bat — our boiler was essentially configured backwards… heating the center of the house first rather than the perimeter and plumbed to dump ice-cold water back into the boiler creating condensation that would eventually destroy the appliance (and in our case, prematurely age it a bit)… It only took an hour or so of hustle and effort (I could tell they were hustling a it and appreciated the haste in a situation where "time = money") to get the system configured correctly and stop some small leaks.

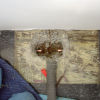
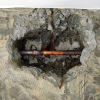
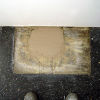
Once the boiler was plumbed properly, they blew out the lines and within just a few minutes we heard hissing air coming from the culprit — a cracked copper pipe about 6 inches from the outside wall. Within the hour, the had the area open, fixed and refilled… and then again tackled the boiler to ensure it was clean, safe and within spec (CO2 emissions-wise)… it is now (but wasn't before).

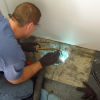
They showed up at 9:00 and were out by 12:30… problem found, problem fixed and system updated and cleaned… I wish we'd have called them in the first place. To date, Glen (the owner and the one pictured below with torch in hand) has been one of the most knowledgeable vendors we've used.

SNC10014
DSC00050
DSC00049
SNC10012
SNC10008
SNC10013

Renovation // Transformation

We Have a Wall

What was once an open stud wall (previously paneled) is now finished. We decided sheetrock was best for a number of reasons — mainly for its ease of install, fix-ability in the future, fire protection, etc.. We also decided to kill the doors between the dining room and laundry room and re-cut the jambs without hinge recesses from new luan stock. We like the open pass-throughs better (and can add a door if we want to later).

Dsc00041
Dsc00039
Dsc00042

Renovation // Transformation

Finishing Touches

With the install of the kitchen countertop, the kitchen is nearly complete — just a bit of finish painting to do (thus the green tape) — and eventually a tile backsplash… perhaps from Heath if we can afford it. Some friends have asked to see pictures and hear details…

Here goes: All cabinetry by Ikea (about $4500K total), Countertops by Silestone (Blanco Maple) through Home Depot (2cm @ $63/sf), Appliances by Bosch, Faucet by Hans Grohe (funny, I've seen this model in sooo many places), Sink by Blanco (Blancospex), breakfast table from Ikea (soon to be replaced with a lower, custom one)… Admittedly, lots of work went into the finishing touches… lots of custom woodwork, trim, etc. which made it (hopefully) a bit nicer than a typical out-of-the-box install.

That said, having a table saw, a steady hand, a good (and patient) helper and an eye for detail is handy… One of the additional steps we took with assembly was to PVA/wood-glue all the dowels as well as glue (liquid nails) all of the edges that join-up in the frames. This made for a bit of extra time, but on one cabinet we had to "re-do", the strongest part was the seams/joints (we had to go a little "Office Space" on it to bust it down for trash-transport). We also caulked the bottom seams once assembled to prevent damage to the frames should water/moisture get in there (it's a kitchen, it's gonna' happen). With all that — plus the extra trim step (flush trim), edging of pieces and a few more "improvements" — we hopefully have a kitchen that will last quite a while.

We also had to get a bit creative when running the electrical feeds to the island. While we have all of the circuits necessary in a modern kitchen, I didn't want to simply have flex-cable running all over loosey-goosey. I was able to craftily run the power in EMT conduit on top of and underneath the island cabinets in a super-tidy fashion. Granted only when you're on a ladder or on your knees would you ever notice such a thing, but it was the "right" way to run it — especially with the open leg design…

On the dishwasher, we hacked some Ikea legs to bolt to the existing leg shafts (see pix below), essentially extending them to the height we needed (which was a bit taller than the dishwasher otherwise wanted to go). This adds a nice finished look to the front plinth area.

Oh, the appliances. Someone asked me how I liked the oven. I don't. The oven takes forrrever to warm up (15 mins), but afterward, it's OK. It was also about 50 deg. off on first install (I had to fiddle with the setting to calibrate it). I need to call Bosch as it doesn't seem like an oven running on 220V should be this wimpy. The cooktop is OK… it's electric and it was what I expected. Hitting 3 different buttons (on >> burner select >> power level) is a bit of a pain when you just want a simple blast of heat, but for both, it beat running gas into the space. We love the dishwasher and the fridge is OK… it's a fridge — it keeps things cold.

If you've questions, please feel free to ask. If it's not obvious, we're pretty candid — hopefully that's helpful to someone.

Edit: Here's a link to the "final" kitchen post — more current info with links to past posts.

Dsc00027 Dsc00024 Dsc00023 Dsc00025 Dsc00031 Dsc00043 Dsc00038 DSC00044

Renovation // Transformation

Labor Ready

We had some drainage issues in the side yard caused by the crazy-hard Concord soil (aahem, clay) and the slope. Not that it was a house-issue (a good feature of being on a slab several inches above the ground), but it does make for a soggy pathway come rain-time (aka November – March) — especially in one particular spot outside the bathroom door.

I started the project the other day and discovered the digging holes is no fun. In comes Labor-Ready. I drive by their offices literally every day (en route to BART), but just stopped by the other day. For $25/hour per person, you can hire labor that comes pre-screened and insured… much safer than picking up someone form a hardware store parking lot.

Chris and Bruce showed up on time (8am) and started digging within minutes of arrival. They worked until they’d excavated a 4X20X2 trench that we filled with better draining material and a french drain to better distribute the water.

So, if you’ve a project you’d been dreading because of the toil it will take, give them a call (925-827-2352 in Concord). For folks in the South Bay, there are locations in Redwood City, San Jose and Mountain View.

Snc18317

Renovation // Transformation

Kitchen Close-up

So, as previously mentioned, we're not finished with the kitchen… still countertops and cleanup (and staging) before any final photos… but here are some detail in-process shots that might help should you decide to install an Ikea kitchen.

(Edit: Sorry for the tiny in-line photos… click on them for larger ones).

Snc18277
This is the edging I mention in the earlier post…

Snc18263 Snc18264
It took a bit of planning to get the reveals the same on both sides of the window.

Snc18268 Snc18269
We installed cover panels on both sides of the inside of the dishwasher to give it a more finished look. This was a very wise choice, methinks.

Snc18261
I wanted the filler pieces to be flush with the doors which meant two things: (1) the pieces had to be 3/4in thick which mean we used the sides of a lot of 30in doors and (2) I had to create something to mount these pieces to. The green tape is s'posed to be some miracle painter's tape — we'll see…

Snc18258 Snc18260
We love the built-in look of the fridge… again, some planning went into this set-up… and a skillful dialing-in of the leg-height.

Snc18265
I installed a switch-controlled outlet behind/within the filler space (as opposed to hard-wiring the light) in the case  we want to change-out the under counter lights.

Snc18266 Snc18270
Some overview shots… To get the "island", we backed up 12in (deep) cabinets to 24in (deep) cabinets which creates a nice-sized island plus tons of storage space.

Snc18276 Snc18280 Snc18279
And speaking of storage… I love the visual ironies that exist in our current existence: (1) Johnathan Adler, meet Rory Gilmore (and Rocky the Squirrel). (2) A place for German stainless steel and French carbon steel knives… and (3) why do we have so much gum?

Renovation // Transformation

Blinds Close-up

A fellow Eichler owner asked me for a bit more detail on our Phifer solar shades. A few more pictures seemed the best way to answer.

When we originally ordered the blinds, we thought we’d like the "reverse roll" option which sort of hides the roll by rolling over, rather than under. However, the regular roll lies a bit closer to the surface (which is good for heat transfer). The only problem is that now the stitches at the bottom are backwards since we’ve turned them around… I’ll live with that one for a short while.

Otherwise, these have a great fit and finish and we’ll be ordering a few more for the other windows soon…

Snc18230
Snc18232
Snc18231
Snc18234

Renovation // Transformation

Sweating the Details

Sorry the kitchen updates are coming in so infrequently, but the progress has been slow. It’s actually finished save the new countertops which were just ordered through a new Home Deopt countertop program where they’re offering 2cm SileStone (which we prefer) for $63/sf with all sorts of free cut-outs and install. Unfortunately, the temporary counters made of particleboard do not make for very good photos (especially when stained with spaghetti sauce), so we’ll hold off for a while on a final photoshoot… but it’s done. Well, mostly.

Anyway, one of the nice things about the Ikea Nexus Yellow-Brown is that it’s been very easy to work with. Granted, we have had quite a few pieces come in damaged or not matched well (lighter, darker, more grain) — but for the most part, it’s been very do-able.

One of the nice things about this pattern — which I can’t say for the others — is that it’s been easy to remanufacture pieces on the fly… In a kitchen like this, nothing is ever really out-of-the-box. Edging the boards has been one element which I’ve found to go smoothly specifically because of the pattern. Nexus is based on an oak veneer and stained to give it the colors in the range. The yellow-brown is just a shade off from MinWax’s Early American stain (somewhere between this and Pecan, but it’s close enough that custom blending would be a waste of time and money).

Using hot-melt edge banding available at most woodworking stores, I’ve been able to give an edge to some inside pieces (no heavy wear) that would have otherwise looked a bit odd if left as particleboard after the saw cut — places like tops, bottoms and interior edges of filler pieces and the inside of the oven cut-out (where you can see the edge through the vent holes). The Ikea edgebanding is a bit thicker than the hot-melt type, but for an interior edge, you can’t tell… plus the added finishing gives the particleboard some protection.

So, a "garage" iron ($10), some edgebanding ($5), a hand edge trimmer ($4) some stain ($4) and some Deft ($5) has made easy work of the process. I prefer Deft as it dries super fast with its alkyd base — it’s easy to work with and rarely runs or drips. I can finish an edge from saw cut to installation in about an hour and a half… likely sooner than Deft would like me to mention, but I can get 3-4 coats of Deft and a final wipe/buff with wax and steelwool in this timeframe. Makes for an easy finishing and installation.

The picture below is the newly finished edge.

Snc18226
Snc18227

Renovation // Transformation

Kitchen Confidential

So… we’ve been breaking a sweat in trying to get the kitchen project finished off and in doing so, there’s been a sort of radio silence — not because of some grand conspiracy, it’s simply hard to take pictures with sawdust in your eyes.

Anyway, we went with an Ikea kitchen as previously reported and so far, we’re happy. The installation was not terribly difficult, but it was time consuming and, at times, tedious. Brad and Kerensa helped assemble quite a few of the shelves and Stephen came down from Benicia on a Saturday morning to help dead-lift the largest cabinet.

But, the hard work is past us and we hope/think we made some good decisions along the way. Being more craft-oriented than perhaps the typical installer, we did some things that were time consuming, but ultimately "right" (we think)… some of these details coming soon when we can take better pictures.

Here are the first few that Casie took for her sister’s viewing enjoyment.

Img_0519Img_0520Img_0521

Renovation // Transformation

Kitchen Countdown // Stage-1

After living for a year with a "temporary" kitchen, we’re taking the plunge. When we bought the house, there was really no kitchen to speak of — no stove, no working dishwasher, a moldy ‘fridge… it was pretty bad.

We liked the original Eichler set-up so much, we’re keeping the original floorplan (with minor code-oriented changes, of course) which means no moving of major services (which is good). After insulating and drywalling the area — an improvement over the original thin insulation and paneling — we’re set to install the new cabinets and countertops.

We chose Ikea’s Nexus Yellow Brown doors which we’re already used in the adjacent laundry area and master bath. The color pairs well with (or replaces) the original golden-toned mahogany panels and trim. There are many opinions out there on Ikea’s quality, but after looking at a few options, I think they’ll work well for us. In many cases, they’re just as durable — in fact they use Blum hardware which is used on much more expensive lines — and definitely fits the budget. The entire kitchen (cabinets) clocked in at about $5K.

The most amazing bit is that the entire kitchen (save the doors which had to be shipped from LA) fit in the back of the truck… and Marty likes the new, open floor pre-install…

One word of wisdom for anyone contemplating an Ikea kitchen: when picking up the pieces, double-check each box for damage — especially the large/heavy ones — often this means opening them. Don’t hope for the best here as Murphy’s law will get the best of you. There’s only a thin layer of cardboard between a nice sharp melamine edge and something hell-bent on damaging it (forklift, dolly, angry Ikea employee, etc.). We had to make several trips back because one of the larger pieces was damaged… and all of the same unit at the Emeryville store were also damaged. We ended up driving to East Palo Alto for the replacement.


Kit
Mar

Scroll to Top