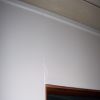
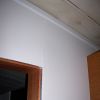
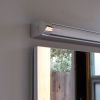
Cracked Drywall…
So… we're getting some drywall cracking over the doors… any ideas?

So… we're getting some drywall cracking over the doors… any ideas?
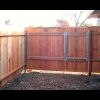
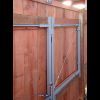
Thanks to the help of neighbors and friends, Bret and Kyle, we have a new fence.
The right side of the house now has a double gate which allows for greater access and the left side will have a single gate — which is also the side the garden will be on which will make hauling stuff in a bit easier. Gate hardware comes from Adjust-a-gate, available at Lowes.
The lack of visible hardware was sort of a happy-accident. Plus, we also replaced part of the neighbor's fence which made the gate post more sturdy and extended the visual line of the fence a bit further, which is nice…

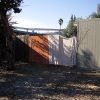
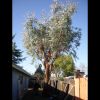
We had a few mulberry trees planted far too close to the house. The operative word being "had" thanks to Lloyd's Tree Service. They also gave the Eucalyptus a much-needed haircut — unfortunately, it had been topped in the past, so the shape will be a bit odd for a while.


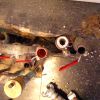
We've had a few troubles with the pipes in the slab recently. A few months ago, Anderson came out to repair a radiant heat leak with great success… Most recently, a cold-water potable leak was causing super-high water bills…
We found the source of the leak with the help of American Leak Detection. Afterward, we called All-Pipe Restoration (Ace DuraFlow) to fix the leak using their epoxy-coating system.
This process saves jack-hammering up the floor — which in our case would have been tough as the lines were quite thick in that area — heat, water, etc… all converging in one spot. The process also protects the entire branch, not just the one spot that was leaking, so it might be good down the road.
Essentially, they break open the lines, blast them clean, flood them with epoxy and let that harden inside the pipe, forming a PVC-like lining inside the pipe. After treatment, you can't solder the pipe anymore and if you do the whole house, you have to take off the supply valves, but in our case, we just fixed one main supply line from one manifold to the next — a pretty easy run. The flow is also as good (or better — since the line is now clean and smooth).
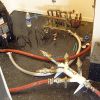
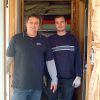
So far, so good… so, if you've a problem, give Sergey a call (pictured below with… Sergey (#2)).

Some friends wanted to see how I spent the weekend (after a FaceBook post relating to furniture building), so here goes… Eventually, we'll need a very large (8 foot wide with 5-bays) hanging media cabinet — which, because of the size and configuration, will be a custom-made piece. I wanted to start with a prototype… and we needed a credenza/shelf/cabinet in the dining room.
Mid Century Modern-esque pieces are hard to find on the new-furniture market and craigslist is always spotty… unless you're Bret who has some weird cheap, vintage furniture karma. The pieces are either crazy expensive or a bit too ersatz. We did find a nice piece at West Elm which would have been the "if we bought it" piece, but for a lot less, we have a custom-made one and one that's a bit wider, which is good for the room — and one that hangs which is good for Roomba (our other pet).
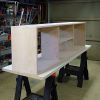
This piece is made from oak plywood and edgebanded, but the final media cabinet will likely be walnut or mahogany to better match the house.
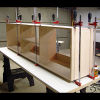
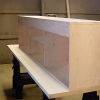
Since it will be hanging, it had to be over-built from a structural standpoint and the whole thing is assembled with joining-biscuits and pocket screws (on the back where they won't show). Simple nails and glue would not have held well. It will hang from the rail in the back/top and screwed straight to studs once we place it. We could've hung it on a removable rail/cleat but this was more straightforward and visually simpler. The back is open to show the wall color and the interior shelves are fixed and set back a bit to add depth to the piece. It will eventually (later today?) be stained black (like my favorite Knoll credenza).
So… on Sunday at 10am, we hadraw materials and by 10pm, it was clamped-up in the garage (with lots of breaks in between).
So, here you go, Bret: pictures… more after it's stained, finished and hung…
Now that the rains are upon us, it's a good time to remember to clean out your downspouts like I did yesterday… I also wanted to show our neighbor how much water he had on his. Here you go, Steve.
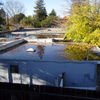
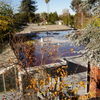
The smartest thing I did today (not wife/gift related… or phone/mom related) was to climb onto the roof to clear one of our downspouts… What seemed like a small puddle was about 80 gallons of standing water above the bedroom. Yikes.
It's interesting to note that this was the only downspout without a wire strainer to prevent backups. So, lesson learned: check your roof and install downspout strainers on all of your downspouts…
The best part about it is that I did this in shorts and a jacket… I love Northern California.
One of the items that tops the Eichler owners' to-do list is exterior beam repair/maintenance… and with the recent rains a few weeks ago, I was reminded that it was time to get busy in the atrium.
I was worried that our exterior beam was dry-rotten on the top from exposure and lack of maintenance, but we got lucky and it wasn't too bad — perhaps the old-growth redwood is indeed a good thing (thanks to Casie's brother Matt for the sanding). That said, there were still a good number of cracks on the sunny side and the top needed some TLC as there was a small bit of dry rot, so the products we ordered from "The Rot Doctor" were put to good use. In the time since we ordered them, I've also seen it in several local (smaller) hardware stores, so check around locally — there are also a few brands: Smith's, Restore-it and others… all the same stuff, really (a 2-part epoxy wood sealer).
Matt sanded the top of the beam with a random-orbital sander and the paint pretty much blew right off. On the sunny-side of the beam, however, the paint was a bit more adhered so I took out the the big guns — the angle grinder with a sanding wheel. On a friend's house, I've also used the Wagner "Paint Eater" and on another a belt sander… both also worked well. The entire beam took about 20 minutes or so to sand to bare wood. It certainly takes a steady hand and it makes an epic mess… it's necessary, though. For a proper sealing and repair, all the paint needs to be gone.
After sanding came the sealing. We used the 2-part CEPS (clear epoxy penetrating sealer) to help seal the beam and it definitely seemed to do the trick — the beam soaked up a quart of the mixture easily (CPES is a 2-part potion). I found that mixing it in small batches in small plastic cups was successful — you don't want to mix up too much at one time as it cures quickly. The top was a pretty easy paint-on/soak-in application, but the side took a bit of trickery. Using a brush loaded with the mix, I let it dribble into the cracks — presumably the same way water would (so sealing was indeed a good thing). After the sealer dried, some auto-shop Bondo did well to fill in most of the larger cracks and holes. A special wood-epoxy-putty is sold, but it's pretty much the same as Bondo and is unnecessarily expensive. After a final sanding and priming (Zinzer 1-2-3 is my favorite exterior primer), it was ready to cap.
We had called several folks about a beam-cap, but no one returned our calls, so I ended up heading to Big Orange for some stock sheet metal. 3 pieces of 1inX2in roof-edge flashing did the trick (2 long pieces + 2 cut pieces) along with a generous bead of PL-brand flashing sealant. While not as ideal as a one-piece cap, the metal was less that $10 for the 3 pieces and the sealant was $5, so for $15 plus a few screws, we have a beam-cap that looks very non-obtrusive and will protect way better than the non-existent coat of paint that was up there. For extra protection, prior to the beam cap, you could run a strip of Vycor or other self-adhering flashing to prevent any future water issues. I didn't do this, but in hindsight, it'd have been a very simple and effective fix — these self-adhesive flashings were invented after the house was built and could be useful in many places where water might be a concern (I used a lot on the deck, for instance, but it would also be useful on the framing under the window sills, around framing for through-the-wall ACs, etc.).
[Edited Fall 2014 with updated information]
As many of you know, work has been put on a slight hold for a while, but in the past week, we've made some progress thanks to a few friends.
This past week, Casie's sister and brother have been visiting and we needed to get the hall bath in order so that it could be used — previously, the only working toilet was in the Master Bath.
While the room is not completely finished, the exterior door has been replaced, the drywall is finished, the floor tile is down and the toilet and sink are in. We still have to demo and re-tile the tub surround, but that'll be for another day.
Porcelain fixtures in but baths are from Duravit through Bath and Beyond in San Francisco (thanks again, Frank). The toilets are from the Starck series and the basin in the hall bath (below) is called Scola. The plumbing fixtures are from Procher from the now discontinued Marc Newson line. The floor tiles are from the Keystone line from Dal-tile (1X1 squares). The 24X30in medicine cabinet (which required some re-framing before drywalling) is from Nutone/Broan's Metro line and the light from Artemide's Rezek line… the basin, cabinet and light are all 24in wide which creates a nice vertical. Ideally, the sink would be about 6in to the right, but re-routing the plumbing for this move didn't make sense… plus it gives Marty a bit of headroom on that side when his box lands there eventually.


Sunday, I think we set a new record for productivity thanks to Jacob, Stefan, Scott and Vincent… all pending-grads or grads from the Academy of Art's Graphic Design Program.
It's always interesting to see your students (or former students) outside of class… and it was likely interesting for them to see where/how their instructors live. We had this rumor going around when I was in design school that all of our instructors lived together in a farm-house on the outskirts of town… well, Concord might not be too far off, but no communal living here — except for the neighborhood cats that freeload (and tend to business) in our mulched yard…
At any rate, Jacob was wise to wrangle the troops early and I was wise to make coffee as Vincent had insomnia the night before and I'm not sure Stefan actually made it to bed after a Halloween party — he still had traces of hair dye from his costume (some video-game army guy with yellow hair… kids these days: what happened to Dracula or…). Within the hour, though, everyone was swinging a hammer or saw.
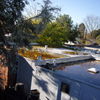
By lunchtime, Jacob and Stefan had demoed the hall bathroom (sorry, pirate-chest motif vanity) and Scott and Vincent had removed most of the siding from the atrium and front of the house… by the afternoon coffee break, siding had been hung and primed in the atrium and a few sheets hung on the front. By nightfall, all of the siding had been hung and a good bit of it primed… Again, it was amazing work.
Thanks guys, I'm not sure you quite know how much the offer and follow-through was/is appreciated. It's one thing to say you'd love to help out, but quite another to dedicate a Sunday, wake-up early, show up and lend a hand…


