Take Care of Your Roof…
Now that the rains are upon us, it's a good time to remember to clean out your downspouts like I did yesterday… I also wanted to show our neighbor how much water he had on his. Here you go, Steve.


Now that the rains are upon us, it's a good time to remember to clean out your downspouts like I did yesterday… I also wanted to show our neighbor how much water he had on his. Here you go, Steve.
The smartest thing I did today (not wife/gift related… or phone/mom related) was to climb onto the roof to clear one of our downspouts… What seemed like a small puddle was about 80 gallons of standing water above the bedroom. Yikes.
It's interesting to note that this was the only downspout without a wire strainer to prevent backups. So, lesson learned: check your roof and install downspout strainers on all of your downspouts…
The best part about it is that I did this in shorts and a jacket… I love Northern California.
One of the items that tops the Eichler owners' to-do list is exterior beam repair/maintenance… and with the recent rains a few weeks ago, I was reminded that it was time to get busy in the atrium.
I was worried that our exterior beam was dry-rotten on the top from exposure and lack of maintenance, but we got lucky and it wasn't too bad — perhaps the old-growth redwood is indeed a good thing (thanks to Casie's brother Matt for the sanding). That said, there were still a good number of cracks on the sunny side and the top needed some TLC as there was a small bit of dry rot, so the products we ordered from "The Rot Doctor" were put to good use. In the time since we ordered them, I've also seen it in several local (smaller) hardware stores, so check around locally — there are also a few brands: Smith's, Restore-it and others… all the same stuff, really (a 2-part epoxy wood sealer).
Matt sanded the top of the beam with a random-orbital sander and the paint pretty much blew right off. On the sunny-side of the beam, however, the paint was a bit more adhered so I took out the the big guns — the angle grinder with a sanding wheel. On a friend's house, I've also used the Wagner "Paint Eater" and on another a belt sander… both also worked well. The entire beam took about 20 minutes or so to sand to bare wood. It certainly takes a steady hand and it makes an epic mess… it's necessary, though. For a proper sealing and repair, all the paint needs to be gone.
After sanding came the sealing. We used the 2-part CEPS (clear epoxy penetrating sealer) to help seal the beam and it definitely seemed to do the trick — the beam soaked up a quart of the mixture easily (CPES is a 2-part potion). I found that mixing it in small batches in small plastic cups was successful — you don't want to mix up too much at one time as it cures quickly. The top was a pretty easy paint-on/soak-in application, but the side took a bit of trickery. Using a brush loaded with the mix, I let it dribble into the cracks — presumably the same way water would (so sealing was indeed a good thing). After the sealer dried, some auto-shop Bondo did well to fill in most of the larger cracks and holes. A special wood-epoxy-putty is sold, but it's pretty much the same as Bondo and is unnecessarily expensive. After a final sanding and priming (Zinzer 1-2-3 is my favorite exterior primer), it was ready to cap.
We had called several folks about a beam-cap, but no one returned our calls, so I ended up heading to Big Orange for some stock sheet metal. 3 pieces of 1inX2in roof-edge flashing did the trick (2 long pieces + 2 cut pieces) along with a generous bead of PL-brand flashing sealant. While not as ideal as a one-piece cap, the metal was less that $10 for the 3 pieces and the sealant was $5, so for $15 plus a few screws, we have a beam-cap that looks very non-obtrusive and will protect way better than the non-existent coat of paint that was up there. For extra protection, prior to the beam cap, you could run a strip of Vycor or other self-adhering flashing to prevent any future water issues. I didn't do this, but in hindsight, it'd have been a very simple and effective fix — these self-adhesive flashings were invented after the house was built and could be useful in many places where water might be a concern (I used a lot on the deck, for instance, but it would also be useful on the framing under the window sills, around framing for through-the-wall ACs, etc.).
[Edited Fall 2014 with updated information]
As many of you know, work has been put on a slight hold for a while, but in the past week, we've made some progress thanks to a few friends.
This past week, Casie's sister and brother have been visiting and we needed to get the hall bath in order so that it could be used — previously, the only working toilet was in the Master Bath.
While the room is not completely finished, the exterior door has been replaced, the drywall is finished, the floor tile is down and the toilet and sink are in. We still have to demo and re-tile the tub surround, but that'll be for another day.
Porcelain fixtures in but baths are from Duravit through Bath and Beyond in San Francisco (thanks again, Frank). The toilets are from the Starck series and the basin in the hall bath (below) is called Scola. The plumbing fixtures are from Procher from the now discontinued Marc Newson line. The floor tiles are from the Keystone line from Dal-tile (1X1 squares). The 24X30in medicine cabinet (which required some re-framing before drywalling) is from Nutone/Broan's Metro line and the light from Artemide's Rezek line… the basin, cabinet and light are all 24in wide which creates a nice vertical. Ideally, the sink would be about 6in to the right, but re-routing the plumbing for this move didn't make sense… plus it gives Marty a bit of headroom on that side when his box lands there eventually.


Sunday, I think we set a new record for productivity thanks to Jacob, Stefan, Scott and Vincent… all pending-grads or grads from the Academy of Art's Graphic Design Program.
It's always interesting to see your students (or former students) outside of class… and it was likely interesting for them to see where/how their instructors live. We had this rumor going around when I was in design school that all of our instructors lived together in a farm-house on the outskirts of town… well, Concord might not be too far off, but no communal living here — except for the neighborhood cats that freeload (and tend to business) in our mulched yard…
At any rate, Jacob was wise to wrangle the troops early and I was wise to make coffee as Vincent had insomnia the night before and I'm not sure Stefan actually made it to bed after a Halloween party — he still had traces of hair dye from his costume (some video-game army guy with yellow hair… kids these days: what happened to Dracula or…). Within the hour, though, everyone was swinging a hammer or saw.
By lunchtime, Jacob and Stefan had demoed the hall bathroom (sorry, pirate-chest motif vanity) and Scott and Vincent had removed most of the siding from the atrium and front of the house… by the afternoon coffee break, siding had been hung and primed in the atrium and a few sheets hung on the front. By nightfall, all of the siding had been hung and a good bit of it primed… Again, it was amazing work.
Thanks guys, I'm not sure you quite know how much the offer and follow-through was/is appreciated. It's one thing to say you'd love to help out, but quite another to dedicate a Sunday, wake-up early, show up and lend a hand…


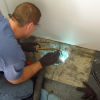
We knew our radiant heat was not top-notch, but the previous vendors assured up (with a leak test) that we were OK and the boiler was safe. Unfortunately neither was true… We got a tip from a neighbor that Anderson Heating were the folks to call and we're glad we did (call them).
They showed up about 5 minutes early, which is always nice, and they assured us that they'd have everything they'd need to do the job with them (and they did). They IDed one problem right off the bat — our boiler was essentially configured backwards… heating the center of the house first rather than the perimeter and plumbed to dump ice-cold water back into the boiler creating condensation that would eventually destroy the appliance (and in our case, prematurely age it a bit)… It only took an hour or so of hustle and effort (I could tell they were hustling a it and appreciated the haste in a situation where "time = money") to get the system configured correctly and stop some small leaks.
Once the boiler was plumbed properly, they blew out the lines and within just a few minutes we heard hissing air coming from the culprit — a cracked copper pipe about 6 inches from the outside wall. Within the hour, the had the area open, fixed and refilled… and then again tackled the boiler to ensure it was clean, safe and within spec (CO2 emissions-wise)… it is now (but wasn't before).
They showed up at 9:00 and were out by 12:30… problem found, problem fixed and system updated and cleaned… I wish we'd have called them in the first place. To date, Glen (the owner and the one pictured below with torch in hand) has been one of the most knowledgeable vendors we've used.


What was once an open stud wall (previously paneled) is now finished. We decided sheetrock was best for a number of reasons — mainly for its ease of install, fix-ability in the future, fire protection, etc.. We also decided to kill the doors between the dining room and laundry room and re-cut the jambs without hinge recesses from new luan stock. We like the open pass-throughs better (and can add a door if we want to later).


With the install of the kitchen countertop, the kitchen is nearly complete — just a bit of finish painting to do (thus the green tape) — and eventually a tile backsplash… perhaps from Heath if we can afford it. Some friends have asked to see pictures and hear details…
Here goes: All cabinetry by Ikea (about $4500K total), Countertops by Silestone (Blanco Maple) through Home Depot (2cm @ $63/sf), Appliances by Bosch, Faucet by Hans Grohe (funny, I've seen this model in sooo many places), Sink by Blanco (Blancospex), breakfast table from Ikea (soon to be replaced with a lower, custom one)… Admittedly, lots of work went into the finishing touches… lots of custom woodwork, trim, etc. which made it (hopefully) a bit nicer than a typical out-of-the-box install.
That said, having a table saw, a steady hand, a good (and patient) helper and an eye for detail is handy… One of the additional steps we took with assembly was to PVA/wood-glue all the dowels as well as glue (liquid nails) all of the edges that join-up in the frames. This made for a bit of extra time, but on one cabinet we had to "re-do", the strongest part was the seams/joints (we had to go a little "Office Space" on it to bust it down for trash-transport). We also caulked the bottom seams once assembled to prevent damage to the frames should water/moisture get in there (it's a kitchen, it's gonna' happen). With all that — plus the extra trim step (flush trim), edging of pieces and a few more "improvements" — we hopefully have a kitchen that will last quite a while.
We also had to get a bit creative when running the electrical feeds to the island. While we have all of the circuits necessary in a modern kitchen, I didn't want to simply have flex-cable running all over loosey-goosey. I was able to craftily run the power in EMT conduit on top of and underneath the island cabinets in a super-tidy fashion. Granted only when you're on a ladder or on your knees would you ever notice such a thing, but it was the "right" way to run it — especially with the open leg design…
On the dishwasher, we hacked some Ikea legs to bolt to the existing leg shafts (see pix below), essentially extending them to the height we needed (which was a bit taller than the dishwasher otherwise wanted to go). This adds a nice finished look to the front plinth area.
Oh, the appliances. Someone asked me how I liked the oven. I don't. The oven takes forrrever to warm up (15 mins), but afterward, it's OK. It was also about 50 deg. off on first install (I had to fiddle with the setting to calibrate it). I need to call Bosch as it doesn't seem like an oven running on 220V should be this wimpy. The cooktop is OK… it's electric and it was what I expected. Hitting 3 different buttons (on >> burner select >> power level) is a bit of a pain when you just want a simple blast of heat, but for both, it beat running gas into the space. We love the dishwasher and the fridge is OK… it's a fridge — it keeps things cold.
If you've questions, please feel free to ask. If it's not obvious, we're pretty candid — hopefully that's helpful to someone.
Edit: Here's a link to the "final" kitchen post — more current info with links to past posts.


Casie likes the new vermicomposter and the worms — all of whom are named "Stan" — seem to be happy (and multiplying).
These are red-wigglers — the best for vermicomposting. They’ll eat
anything that was once living — paper, coffee grounds, veggies,
flowers, sawdust… some even say a telephone book… and the worm-poop
is good for the garden.
Previously, we had a single black bin, but we got this one at the local Elephant Pharmacy and gave the old one (and 1/2 the worms… of 1/2 the Stans) to our neighbors Kyle and Sarah. If an adult is having this much fun, some 4th graders would be lovin’ it for sure. Locally, you can get your worms from "the worm dude" (search for it on Craigslist — he travels from farmers market to market) or you can find them online…


We had some drainage issues in the side yard caused by the crazy-hard Concord soil (aahem, clay) and the slope. Not that it was a house-issue (a good feature of being on a slab several inches above the ground), but it does make for a soggy pathway come rain-time (aka November – March) — especially in one particular spot outside the bathroom door.
I started the project the other day and discovered the digging holes is no fun. In comes Labor-Ready. I drive by their offices literally every day (en route to BART), but just stopped by the other day. For $25/hour per person, you can hire labor that comes pre-screened and insured… much safer than picking up someone form a hardware store parking lot.
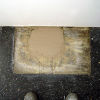
Chris and Bruce showed up on time (8am) and started digging within minutes of arrival. They worked until they’d excavated a 4X20X2 trench that we filled with better draining material and a french drain to better distribute the water.
So, if you’ve a project you’d been dreading because of the toil it will take, give them a call (925-827-2352 in Concord). For folks in the South Bay, there are locations in Redwood City, San Jose and Mountain View.

