First, Heath Ceramics is awesome. Really. Not only do they make fantastic products, but they are genuinely lovely people. Long story short: We had an issue with the tile we purchased, but — because the project was put on hold due to Casie's sickness — we were far outside the exchange date. Eric, the Tile Manager, not only got us what we needed, he suggested a change for the better — and the project looks better for it.
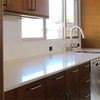
Otherwise, we now have a blacksplash. It's taken a year-and-a-half since we "finished" the kitchen, but those in the know know we've been preoccupied with other things. This weekend, we moved forward.
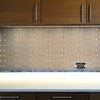
We've always been huge fans of Heath and hoped to use their stuff in the house somewhere, but it's sort of pricey for our limited budget. However, they've recently introduced their Modern Basics line which is in-stock and at a competitive price ($16.50/sqf). We purchased 2X6 River Bed, which is a shade darker than their iconic French Gray.
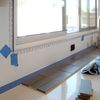
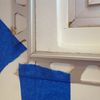
Eric's idea was to use the Schluter Aluminum edging (which they also stock at $14/8-foot section) instead of a bullnose and it turned out great. I was nervous about the miter cut, but so far, so good. Since it was such an integral part of the window, we glued it up first rather than letting it naturally be at the tile's edge… and good thing — we were off by about 1/4in over the length of the window (i.e.: one side was 1/4in more than the other when measuring from the counter to window lip)… enough that it'd look crooked had we not measured twice.
The cuts around the outlets were a bit tricky, but we managed to finish the job with three tiles left over (yes, only three) from our 12sqf box. I even used the sample tile from the sample-pack.
Presently, I'm waiting for the caulk to dry before I start grouting, but here are some in-process photos. We chose Custom's "bone" colored grout (likely with a bit of light smoke mixed in at a 6:1 ratio)… it was between alabaster and bone, but after it dried, bone won out (which reminds me to remind you to let the grout dry thoroughly before making a decision — had we not, the choice would have been too light).