Tiling: The first step…
The tiling job in the bath has been a project a long-time in coming… and to be honest, I'm a bit apprehensive about tackling it. I will be our first major, vertical ceramic-tile job. Maybe that's why it took 2 years to approach.
But it's time — and to start, we needed a good base. There's all sorts of very low- and very high-tech solutions out there. Since we were generally re-tiling (and not moving anything), we didn't need to look at a newly-mudded floor, but that was one option — to tear it all out and start over. With the radiant heat lines in the floor and a perfectly working drain system, it made little sense to jack up the floor and start from scratch.
We also looked at the Kerdi membrane which was almost a keeper save the fact that for the "full" system, you also needed to use their special, but very cool, drain. If we were doing a brand-new install (like in new construction), I'd definitely select this system.
Then there was vapor barrier and cement board in a traditional installation… but the original install didn't seem to have a shower pan or liner when we tore it out… which isn't the worst thing on slab construction, but we thought we could do a bit better than the original.
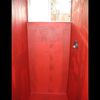
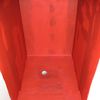
Thanks to the wisdom of the folks at the John Bridge Tile Forum, we opted for Hardibacker and a waterproofing layer(s) of RedGard. Hardibacker is much easier to cut that Durock or Wonderboard and it completely immune to water damage. With no barrier behind it, but a full barrier of RedGard, the shower should stay nice and dry — even dryer than a traditional shower as there should be no water penetration to the substrate. In fact, with the RedGard, I could have likely just used Drywall, but that seemed like cheating, somehow (Kerdi actually recommends drywall behind their membrane).
Casie is calling it the "death shower" because of the red color. It'll be white soon enough. And hopefully waterproof.
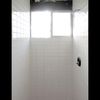
Update: It only took about 6 hours for Casie and I to wrap the shower in white subway tile (one by one). It's not a bad first attempt methinks and I can't think of anything we'd have done differently (yet) — except maybe "bricked" the pattern (to hide seams, crooked lines, etc.), but that would have meant cutting a lot of 1/2 tiles. There were some happy alignments with tile and some little nits (the corners necessitated either a sliver of tile or a lot of grout. I opted for the sliver). We learned a couple of things:
1: the $59 4in tile saw from Harbor Freight with the $12 diamond blade (we found the saw on sale for $44) worked quite well for these little tiles. Granted a 12X12 would have been hard to cut, this el-cheapo tool performed wonderfully. Plus, the teeny size meant I had it next to me the whole time. It's really, really loud, though.
2: Starting from the bottom is a must. As much as I wanted to have the top edges be a full tile and the bottom edges disappear into the floor, gravity had other ideas. As it were, we got lucky as the top courses are all full pieces.
3: Working in teams is ideal… one person mixing thinset and getting tile and another cutting and placing. It'd have been a hard job solo.